This page is for anyone who is new to Discord and would like a little help to understand how it works.
How to Join a Group
Most of our Zoom webinars include access to a Discord group for sharing and discussion among registered attendees. But before you can join one of our groups, you will need an invitation link. We will provide the necessary information during the first Zoom meeting as it can vary with each group.
IMPORTANT: Before accepting the invitation to our group, please be sure you have a Discord membership (register here — it’s free) and that you are logged into it. If you are not logged in, you run the risk of Discord creating a new membership account for you every time you accept our group invitation. This can cause much frustration.
Also note that you only need to use the invitation link ONCE. After that, our group is added to your Discord interface and you can access it whenever you’re logged in — until you choose to quit the group. If you joined at an earlier date and now you can’t find our group, it’s likely that you have logged into a different Discord account than the one you used to join our group (see previous paragraph!).
The Main Interface
Discord is, at its core, a social media platform. It was originally developed for gamers but now has a much broader audience.
You can access it from a web browser or a free app. The interface is similar for either but can be very different on a smart phone or tablet. This page only describes the layout for a web browser or the app.
The main Discord interface has 4 main sections. The diagram below approximates what you’ll see when you first join. Some of the items will vary among groups. For instance: The group icon will usually be different for each group, you may see different channels (#2 below) and of course different posts (#3), and different members (#4) — these names are only placeholders.
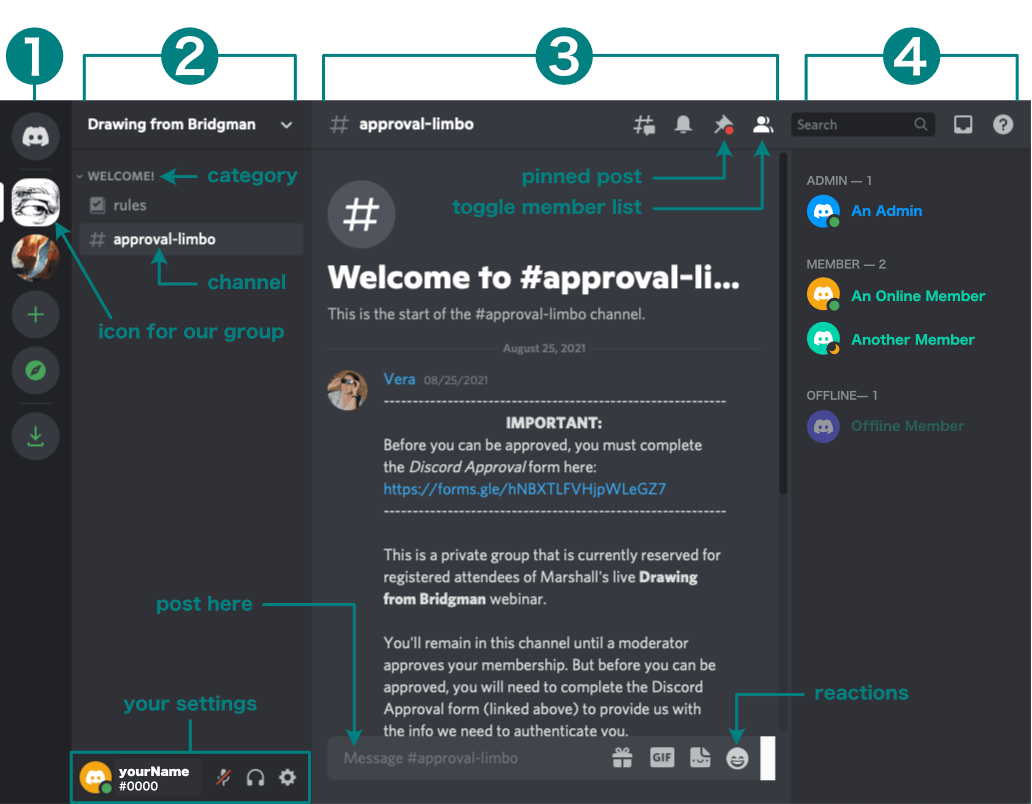
Click the image to enlarge it.
#1 – Groups
The narrow column at the far left is where you can access any of the groups you joined (Discord calls them servers) or the messaging center (the Discord button at the very top of the column). Each group normally has a unique icon. In this example, there are icons for two different Discord groups. If you’re invited to one of our groups, we will show you what the icon looks like during the course or on our website. Click these icons to navigate between any of the groups you belong to. If you’re new to Discord, you may only see one group icon. This diagram shows two.
When a group icon has a white vertical bar to the left of it, the icon will be in a round-cornered box. This indicates that it is the active group and you can navigate it’s channels. Any other group icons (inactive) will appear as a circular icon until you click to activate one.
If at any time you find yourself somewhere in Discord that doesn’t look familiar, you might have accidentally clicked into another group or into the message center. Click on our group icon and it will get you back into our group.
Ignore the three green buttons below the group icons. They aren’t needed for beginners.
#2 – Channels
This panel is like the table of contents for the group. At the very top is the name of the group. Category names appear in ALL CAPS here. Categories are used for grouping related channels. Channel names are usually preceded by a # symbol (few exceptions). At first you will only see one category (WELCOME!) and one or more channels in it (in this example, it’s only the #approval-limbo channel). After approval you’ll see more categories and channels.
If a channel name is light gray, it means no new posts were added since the last time you were in the channel. If the name is white, it indicates it has posts you may not have seen.
You can click on a category name to collapse or expand the list of channels it contains. However, the active channel (the one you’re in) and any channels with new posts will not collapse. After you enter a channel with unread posts, the posts won’t register as being unseen anymore (even if you haven’t literally seen them) so they’ll appear in light gray and they can be collapsed until new posts are added.
Account Settings: At the very bottom of the Channels panel are your account settings. Click the gear icon to do things like change your avatar, password, notifications preferences, etc. None of this is essential if you’re brand new to Discord.
The following Categories do not appear in the sample screen. They (and others) only appear after you’re approved:
SHARE & DISCUSS: This category will have the channels where most of the activity in our group occurs.
VOICE CHANNELS: Use these to have voice conversations with other members — like a phone. If you click on one of these channels, don’t forget to “hang up” when you finish! Click the little phone receiver icon to the right of the green Voice Connected label at the bottom of the Channels column (it only appears when a voice channel is activated).
#3 – Discussions
When you click on a channel, the discussion thread for that channel displays here and the name of the channel appears at the top of the panel. The comment field (for posting text, images, emojis, etc.) is at the bottom of this panel. Most channels are open to posting, but if it’s a read-only channel, there will usually be a notice saying so. If commenting is locked, it will also indicate that if you try to post.
You can use emojis in your post. You can add one by clicking the icon I labeled reactions (that one is actually the emoji icon but it looks similar to the reaction icon). The emoji icon appears inside the box where you write your post. When you hover over any published post, a similar icon will appear for adding reactions. It appears in the top right corner of a published post when hovering. When you add reactions, they appear directly below the post. You can also click a reaction someone else added to agree with it. Sometimes we make use of reactions for voting.
If you want to reply to a post, hover over that post and hold down the shift key. A toolbar with a reply button will appear. Hovering over any button will tell its purpose.
There is also a row of small icons (buttons) at the very top of this panel. Hovering over any button will tell its purpose.:
If a discussion has pinned posts, the push pin icon will show or hide them. If there’s a red dot on the icon, it indicates a post was pinned since the last time you looked.
The member button shows/hides the member list (see #4 below).
The bell button will allow you to mute notifications from the current channel.
The button with the # shows/hides threads. This may not be activated with some groups and beginners can do without this.
#4 – Members
The last section is the Member List. You can toggle this panel to hide/show it by clicking the Member List icon at the top of the Discussion panel (#3).
Members are grouped by their Discord role. Offline members are dimmed. Right-clicking a member’s name will bring up a menu with various functions related to that member, such as direct messaging them.
I hope this helped a bit. If you’re still confused, contact Vera here.